for(let j = 0; j < 10; j++){
    var arr = [];
    console.time("1-1.calculatingTime")
    for (var i = 1; i <= 1000000; i++) {
        arr[i] = i;
    }

    console.timeEnd('1-1.calculatingTime');

    //  -------------------------------------
    var arr = [];
    console.time("2-1.calculatingTime")
    for (var i = 1; i <= 1000000; i++) {
        arr.push(i);
    }
    console.timeEnd('2-1.calculatingTime');
}
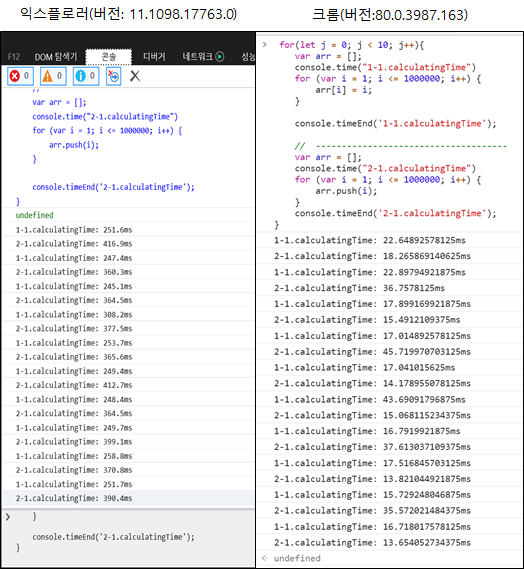
1-2. 결과 :
익스의 경우 arr[i] = i가 성능상 빠름,
크롬의 경우 arr[i]가 빠르다고 생각하여 테스트를 진행하였으나,
엎치락뒤치락 하는 기록이 있음 (평균값. arr[i] = i : 20.79489746ms , arr.push(i) : 24.61420898)
2-1. 테스트
var j = 0;
for (j = 0; j < 10; j++) {
    var sum = 0;
    var arr = [];
    console.time("1.calculatingTime")
    for (var i = 1; i <= 1000000; i++) {
        sum += i;
        arr[i] = sum;
    }

    console.timeEnd('1.calculatingTime');
}
//  -------------------------------------
var j = 0;
for (j = 0; j < 10; j++) {
    var sum = 0;
    var arr = [];
    console.time("2.calculatingTime")
    for (var i = 1; i <= 1000000; i++) {
        sum += i;
        arr.push(sum);
    }

    console.timeEnd('2.calculatingTime');
}
2-2 결과
익스의 경우 여전히 arr[i] = i가 성능상 빠름,
크롬의 경우 엎치락뒤치락 하는 기록이 있음(평균값. arr[i] = i : 75.38521ms , arr.push(i) : 78.85928)
"address": "229 Kermit Place, Nipinnawasee, District Of Columbia, 1696",
"about": "Est mollit eiusmod dolor aliqua labore deserunt excepteur occaecat minim. Cupidatat est aliqua sint duis do. In voluptate aliquip eiusmod velit.\r\n",
"registered": "2014-05-15T03:59:40 -09:00",
"latitude": 37.243509,
"longitude": -171.874641,
"tags": [
"mollit",
"exercitation",
"nisi",
"consequat",
"non",
"adipisicing",
"ullamco"
],
"friends": [
{
"id": 0,
"name": "Vega Wallace"
},
{
"id": 1,
"name": "Ingrid Neal"
},
{
"id": 2,
"name": "Janie Soto"
}
],
"greeting": "Hello, undefined! You have 6 unread messages.",
"favoriteFruit": "strawberry"
},
{
"_id": "5dac8d11b430a10d199a3697",
"index": 1,
"guid": "6b02729a-8328-429e-b965-a8553eff4d09",
"isActive": true,
"balance": "$3,770.58",
"address": "234 Lewis Avenue, Shasta, Kansas, 1815",
"about": "Laboris ipsum incididunt sunt Lorem. Lorem officia nostrud laboris quis consequat ullamco elit magna irure. Consectetur duis cupidatat est in quis velit quis mollit.\r\n",
"registered": "2016-05-15T04:52:17 -09:00",
"latitude": 12.9566,
"longitude": 61.266088,
"tags": [
"cillum",
"sint",
"consequat",
"veniam",
"quis",
"nisi",
"eu"
],
"friends": [
{
"id": 0,
"name": "Shaw Haney"
},
{
"id": 1,
"name": "Lavonne Pace"
},
{
"id": 2,
"name": "Kemp Ingram"
}
],
"greeting": "Hello, undefined! You have 6 unread messages.",
"about": "Nostrud ad reprehenderit voluptate dolore irure cupidatat qui nulla id ullamco non mollit veniam ullamco. Sit qui ad tempor tempor commodo ea sunt sunt duis commodo. Proident laborum velit nostrud proident mollit esse laboris sit cillum eu consequat veniam ad consectetur. Voluptate amet excepteur non sit. Veniam nisi est duis officia et irure.\r\n",
"registered": "2014-11-29T05:10:48 -09:00",
"latitude": -10.512397,
"longitude": 156.17502,
"tags": [
"laboris",
"aliquip",
"labore",
"aliquip",
"occaecat",
"qui",
"Lorem"
],
"friends": [
{
"id": 0,
"name": "Harding Reilly"
},
{
"id": 1,
"name": "Pierce Pena"
},
{
"id": 2,
"name": "Leonard Padilla"
}
],
"greeting": "Hello, undefined! You have 8 unread messages.",
"favoriteFruit": "apple"
},
{
"_id": "5dac8d118842409a7b4a592a",
"index": 3,
"guid": "8454e85a-4404-432e-80f3-dd7539e1c0ef",
"isActive": false,
"balance": "$2,683.27",
"address": "466 Navy Walk, Brewster, Texas, 6693",
"about": "Veniam officia aute aliqua reprehenderit deserunt ut cupidatat anim aliqua esse incididunt nulla sunt exercitation. Culpa non voluptate nostrud in. Dolore laboris enim cillum ut proident aliqua aliquip dolore magna veniam fugiat enim. Officia eiusmod do culpa fugiat ut eiusmod consequat enim duis. Anim consequat est aliquip id laborum nisi minim do occaecat. Elit irure amet ipsum nulla ut reprehenderit quis labore ut. Elit eiusmod sunt dolore mollit consectetur velit dolor.\r\n",
"registered": "2016-03-07T08:32:31 -09:00",
"latitude": 1.005155,
"longitude": 67.81042,
"tags": [
"veniam",
"duis",
"in",
"ex",
"laboris",
"amet",
"mollit"
],
"friends": [
{
"id": 0,
"name": "Bradshaw Castaneda"
},
{
"id": 1,
"name": "Nellie Merrill"
},
{
"id": 2,
"name": "Sandoval Hickman"
}
],
"greeting": "Hello, undefined! You have 4 unread messages.",
"about": "Sint magna fugiat laborum consequat enim enim qui in nostrud incididunt eiusmod aliqua adipisicing pariatur. Tempor reprehenderit incididunt incididunt eiusmod ut elit mollit excepteur et culpa commodo. Culpa laborum et veniam est culpa voluptate. Dolore aliqua in nisi mollit commodo aliquip nisi aliquip velit aute mollit. Sit et est ut mollit aute adipisicing. Deserunt eu eu pariatur eiusmod commodo adipisicing culpa exercitation ut. Enim esse eiusmod fugiat reprehenderit adipisicing adipisicing culpa minim magna reprehenderit.\r\n",
"registered": "2018-10-21T05:49:28 -09:00",
"latitude": -58.404005,
"longitude": -95.751783,
"tags": [
"ullamco",
"nulla",
"id",
"reprehenderit",
"quis",
"consectetur",
"sit"
],
"friends": [
{
"id": 0,
"name": "Allison Burnett"
},
{
"id": 1,
"name": "David Sharp"
},
{
"id": 2,
"name": "Hattie Osborn"
}
],
"greeting": "Hello, undefined! You have 4 unread messages.",
"favoriteFruit": "strawberry"
},
{
"_id": "5dac8d11eca02cdd7090c991",
"index": 5,
"guid": "60ab4eb0-991a-425c-ad3c-919329a13142",
"isActive": true,
"balance": "$1,204.71",
"address": "330 Stewart Street, Harviell, Wyoming, 9337",
"about": "Est irure ex aute amet adipisicing incididunt exercitation incididunt laborum reprehenderit. Aliquip aliquip tempor deserunt magna qui nostrud velit ea eu voluptate laborum. Occaecat reprehenderit dolore consectetur eiusmod. Do ea adipisicing velit eiusmod quis laborum commodo nostrud. Dolore eiusmod occaecat elit ad proident elit velit nisi fugiat labore excepteur officia.\r\n",
"registered": "2014-11-09T02:33:56 -09:00",
"latitude": -2.544352,
"longitude": 152.762735,
"tags": [
"tempor",
"culpa",
"adipisicing",
"amet",
"aliquip",
"ad",
"commodo"
],
"friends": [
{
"id": 0,
"name": "Middleton Lewis"
},
{
"id": 1,
"name": "Aguilar Lindsey"
},
{
"id": 2,
"name": "Douglas Finch"
}
],
"greeting": "Hello, undefined! You have 5 unread messages.",
$(".prev").on("click", function (e) {
      e.preventDefault();

      // 이미지 현재의 위치
      var imgOn = $(".imgBox").find(".on").index();
      // 이미지 총 개수
      var imgLen = $(".imgBox .img").length;
      console.log(imgOn)

      // imgBox안의 img 중 imgOn 번째의 on 클래스 삭제
      $(".imgBox .img").eq(imgOn).removeClass("on");
      // imgBox안의 img 중 imgOn 번째 숨기기
      $(".imgBox .img").eq(imgOn).css("opacity", 0);

      //  이전의 위치로 돌아가야함으로
      imgOn = imgOn -1;

      if( imgOn < 0 ){
        // 돌아가 위치가 -1일 경우
        // 이미지의 마지막으로 돌아간다
        $(".imgBox .img").eq(imgLen -1).css("opacity", 1);
        $(".imgBox .img").eq(imgLen -1).addClass("on");
      }else{
        // 돌아갈 위치가 -1이 아닌 경우
        $(".imgBox .img").eq(imgOn).css("opacity", 1);
        $(".imgBox .img").eq(imgOn).addClass("on");
      }

    });

    $(".next").on("click", function (e) {
      e.preventDefault();
      // 위에 동일
      var imgOn = $(".imgBox").find(".on").index();
      var imgLen = $(".imgBox .img").length;

      // 위에 동일
      $(".imgBox .img").eq(imgOn).removeClass("on");
      $(".imgBox .img").eq(imgOn).css("opacity", 0);

      // 다음의 위치로 알아야 되기 때문에
      imgOn = imgOn + 1;

      if( imgOn === imgLen ){
        // 다음의 위치가 총 개수보다 클 경우
        // 처음의 위치로 돌아간다
        $(".imgBox .img").eq(0).css("opacity", 1);
        $(".imgBox .img").eq(0).addClass("on");
      }else{
        // 다음 위치가 있는 경우
        $(".imgBox .img").eq(imgOn).css("opacity", 1);
        $(".imgBox .img").eq(imgOn).addClass("on");
      }
    });
<head>
    <title>자동생성파일</title>
    <!-- css에는 autocomplet의 요소를 만들떄 필요한 css가 담겨져 있습니다. -->
    <link rel="stylesheet" href="css/autocomplete.css">
    <!-- css에는 autocomplet의 요소를 만들떄 필요한 scrpit가 담겨져 있습니다. -->
    <script type="text/javascript" src="js/autocomplate.js"></script>
    <!-- css에는 autocomplet의 요소의 샘플 json의 값이 담겨져 있습니다. -->
    <script type="text/javascript" src="js/animal.js"></script>
</head>
- body 부분
<body onload="init()">
    <!-- 아래의 input의 값을 받을 때, 자동완성 기능이 작동합니다. -->
    <div class="srch_form autocomplete">
        <input id="autoInput" placeholder="Search...">
    </div>
    <script>
        // autocomplete 부분을 생성
        window.onload = function () {
            autocomplete.setAutocomplete(document.getElementById("autoInput"), animal)
        }
    </script>
</body>
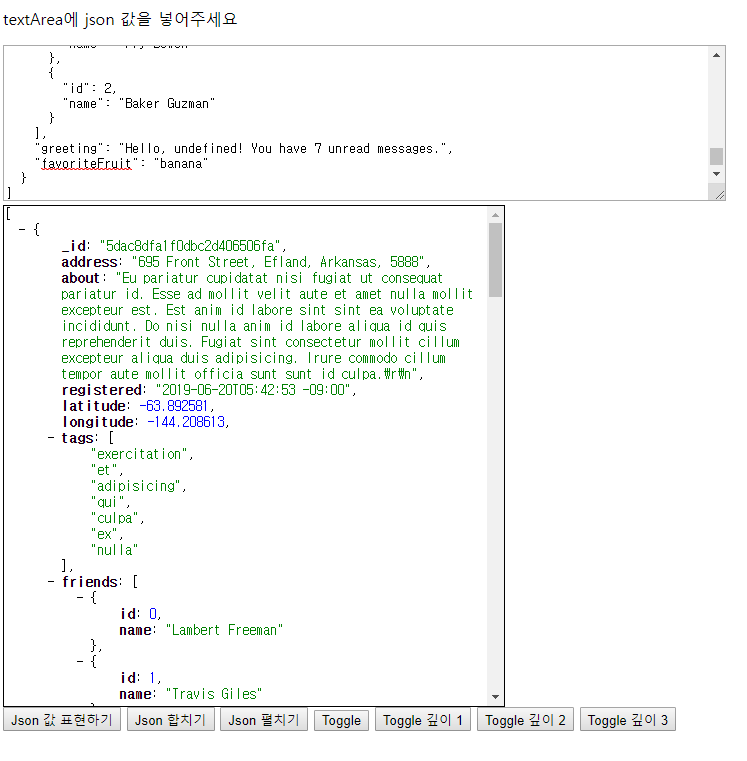
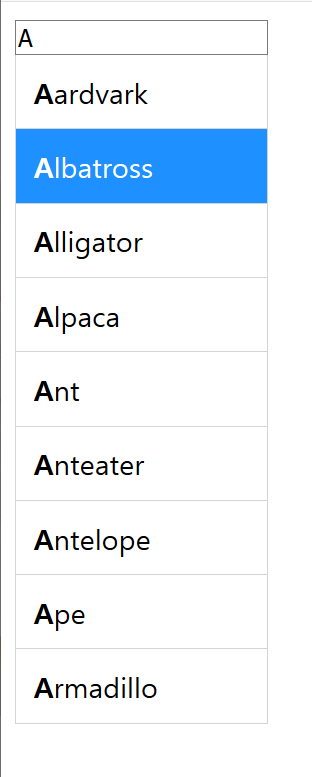
- 화면 설명
input에 특정한 값을 입력하면, 그 값에 따라서 자동완성 기능을 수행합니다.
- css (autocomplete.css) : autocomplete 기능에 필요한 css
var animal = ["Aardvark","Albatross","Alligator","Alpaca","Ant","Anteater","Antelope","Ape","Armadillo","Donkey","Baboon","Badger","Barracuda","Bat","Bear","Beaver","Bee","Bison","Boar","Buffalo","Butterfly","Camel","Capybara","Caribou","Cassowary","Cat","Caterpillar","Cattle","Chamois","Cheetah","Chicken","Chimpanzee","Chinchilla","Chough","Clam","Cobra","Cockroach","Cod","Cormorant","Coyote","Crab","Crane","Crocodile","Crow","Curlew","Deer","Dinosaur","Dog","Dogfish","Dolphin","Dotterel","Dove","Dragonfly","Duck","Dugong","Dunlin","Eagle","Echidna","Eel","Eland","Elephant","Elk","Emu","Falcon","Ferret","Finch","Fish","Flamingo","Fly","Fox","Frog","Gaur","Gazelle","Gerbil","Giraffe","Gnat","Gnu","Goat","Goldfinch","Goldfish","Goose","Gorilla","Goshawk","Grasshopper","Grouse","Guanaco","Gull","Hamster","Hare","Hawk","Hedgehog","Heron","Herring","Hippopotamus","Hornet","Horse","Human","Hummingbird","Hyena","Ibex","Ibis","Jackal","Jaguar","Jay","Jellyfish","Kangaroo","Kingfisher","Koala","Kookabura","Kouprey","Kudu","Lapwing","Lark","Lemur","Leopard","Lion","Llama","Lobster","Locust","Loris","Louse","Lyrebird","Magpie","Mallard","Manatee","Mandrill","Mantis","Marten","Meerkat","Mink","Mole","Mongoose","Monkey","Moose","Mosquito","Mouse","Mule","Narwhal","Newt","Nightingale","Octopus","Okapi","Opossum","Oryx","Ostrich","Otter","Owl","Oyster","Panther","Parrot","Partridge","Peafowl","Pelican","Penguin","Pheasant","Pig","Pigeon","Pony","Porcupine","Porpoise","Quail","Quelea","Quetzal","Rabbit","Raccoon","Rail","Ram","Rat","Raven","Red deer","Red panda","Reindeer","Rhinoceros","Rook","Salamander","Salmon","Sand Dollar","Sandpiper","Sardine","Scorpion","Seahorse","Seal","Shark","Sheep","Shrew","Skunk","Snail","Snake","Sparrow","Spider","Spoonbill","Squid","Squirrel","Starling","Stingray","Stinkbug","Stork","Swallow","Swan","Tapir","Tarsier","Termite","Tiger","Toad","Trout","Turkey","Turtle","Viper","Vulture","Wallaby","Walrus","Wasp","Weasel","Whale","Wildcat","Wolf","Wolverine","Wombat","Woodcock","Woodpecker","Worm","Wren","Yak","Zebra"
]
- autocomplate.js : autocomplete를 수행하는 스크립트
싱글톤으로 작성되었으며 , 아래의 주석은 쭈욱 따라가시면서 파악하시면 좋을 것 같습니다.
let autocomplete = (function () {

    let _inp = null;

    let _arr = [];

    let _currentFocus;

    let _setAutocomplete = function (inp, arr) {
        // autocomplete할 배열
        _arr = arr;

        // 기존의 input 값과 같지 않다면, 리스너 해제
        if (_inp === inp) {
            return;
        }
        // 기존 리스너해제
        _removeListener();

        // 새로운 input 의 리스너 추가.
        _inp = inp;
        _inp.addEventListener("input", inputEvent);
        _inp.addEventListener("keydown", keydownEvent);
    }

    let inputEvent = function (e) {
        var a, b, i, val = this.value;

        // 이전 생성된 div 제거
        closeAllLists();

        // 요소 확인
        if (!val) {
            return false;
        }

        // 현재의 포커스의 위치는 없음.
        _currentFocus = -1;

        // autocomplet에서 항목을 보여줄 div 생성
        a = document.createElement("DIV");
        //
        a.setAttribute("id", this.id + "autocomplete-list");
        // css 적용
        a.setAttribute("class", "autocomplete-items");

        // input 아래의 div 붙이기.
        this.parentNode.appendChild(a);

        // autocomplet할 요소 찾기
        for (i = 0; i < _arr.length; i++) {
            // 배열의 요소를 현재 input의 value의 값만큼 자른 후, 같으면 추가한다.
            if (_arr[i].substr(0, val.length).toUpperCase() == val.toUpperCase()) {
                b = document.createElement("DIV");
                // value의 값 만큼 굵게 표시
                b.innerHTML = "<strong>" + _arr[i].substr(0, val.length) + "</strong>";
                b.innerHTML += _arr[i].substr(val.length);
                b.innerHTML += "<input type='hidden' value='" + _arr[i] + "'>";

                // console.log(b);
                // <div class="autocomplete-active"><strong>B</strong>adger<input type="hidden" value="Badger"></div>

                // 생성된 div에서 이벤트 발생시 hidden으로 생성된 input안의 value의 값을 autocomplete할 요소에 넣기
                b.addEventListener("click", function (e) {
                    _inp.value = this.getElementsByTagName("input")[0].value;
                    closeAllLists();
                });

                // autocomplete 리스트를 붙이기.
                a.appendChild(b);
            }
        }
    }

    let keydownEvent = function (e) {
        //
        var x = document.getElementById(this.id + "autocomplete-list");
        // 선택할 요소 없으면 null ,
        // <div id="autoInputautocomplete-list" class="autocomplete-items"><div class="autocomplete-active"><strong>A</strong>ardvark<input type="hidden" value="Aardvark"></div><div><strong>A</strong>lbatross<input type="hidden" value="Albatross"></div><div><strong>A</strong>lligator<input type="hidden" value="Alligator"></div><div><strong>A</strong>lpaca<input type="hidden" value="Alpaca"></div><div><strong>A</strong>nt<input type="hidden" value="Ant"></div><div><strong>A</strong>nteater<input type="hidden" value="Anteater"></div><div><strong>A</strong>ntelope<input type="hidden" value="Antelope"></div><div><strong>A</strong>pe<input type="hidden" value="Ape"></div><div><strong>A</strong>rmadillo<input type="hidden" value="Armadillo"></div></div>
        if (x) {
            // 태그 네임을 가지는 엘리먼트의 유요한 html 컬렉션을 반환.
            // div의 값을 htmlCollection의 값으로 받아옴.
            x = x.getElementsByTagName("div");
        }

        if (e.keyCode == 40) {
            // down
            // 현재위치 증가
            _currentFocus++;
            // 현재위치의 포커스 나타내기
            addActive(x);
        } else if (e.keyCode == 38) {
            // up
            // 현재위치 감소
            _currentFocus--;
            // 현재위치의 포커스 나타내기
            addActive(x);
        } else if (e.keyCode == 13) {
            // enter
            e.preventDefault();
            // 현재위치가 아이템 선택창내에 있는 경우
            if (_currentFocus > -1) {
                // 현재 위치의 값 클릭
                if (x) x[_currentFocus].click();
            }
        }
    }

    // document.addEventListener("click", function (e) {
    //     closeAllLists(e.target);
    // });


    let addActive = function (x) {
        if (!x) return false;
        removeActive(x);
        if (_currentFocus >= x.length) _currentFocus = 0;
        if (_currentFocus < 0) _currentFocus = (x.length - 1);
        x[_currentFocus].classList.add("autocomplete-active");
    }


    let removeActive = function (x) {
        for (var i = 0; i < x.length; i++) {
            x[i].classList.remove("autocomplete-active");
        }
    }


    let closeAllLists = function (elmnt) {
        var x = document.getElementsByClassName("autocomplete-items");
        for (var i = 0; i < x.length; i++) {
            if (elmnt != x[i] && elmnt != _inp) {
                x[i].parentNode.removeChild(x[i]);
            }
        }
    }


    let _removeListener = function () {
        if (_inp !== null) {
            console.log(_inp)
            _inp.removeEventListener("input", inputEvent, false);
            _inp.removeEventListener("keydown", keydownEvent, false);
        }
    }
    return {

        setAutocomplete: function (inp, arr) {
            _setAutocomplete(inp, arr);
        },
    }

})();
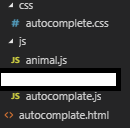
- 폴더 구조 : 위에 소스를 아래와 같은 폴더 구조로 만들어서 사용하시면 동일하게 작동할겁니다.